
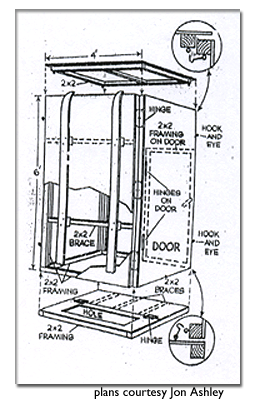
This shanty can be built quickly and towed across the ice
Snow covers the ground and skimpy icy covers some lakes. Even though a few daring anglers are fishing, fishermen are hoping for more cold temperatures to make solid ice for the next few weeks.
Thirty-six years ago when I moved into the Traverse City area, got married to a lady who worked in a ski shop, and we became friends with a co-worker while I befriended Jon Ashley of Traverse City. He and I traveled all over hunting caribou, deer, moose, wild boar and much more.
“I love ice fishing but my fingers have been frostbit several times,” I told him. “My fingers and hands hurt when they get cold. I need a shanty I can tow onto the ice.”
I like fishing inside a shanty because it helps protect frostbit fingers
Ashley is an idea guy, and he quickly set to building a collapsible shanty that weighs very little, is inexpensive to make and is big enough for two people to fish comfortably. Having a pull-along shanty eliminates chopping big heavy shanties from the ice as spring approaches. At that time, portable shanties were seldom seen.
“I’ve always wanted a collapsible shanty, one that be pulled on and off the ice each day and something that could be put up or taken down in less than five minutes by one man,” Ashley said. “And, it has to cost less that $60, using material easily purchased at a lumberyard.”
The $60 shanty he built is sturdy enough that it can be towed on skis across the ice. These are his plans and instructions, and the shanty can easily be built in time to be used during the future, although it may cost more than the original $60 now..
Wood isn’t cheap, but knotty 2X4s or enough 1X2s to complete the job often can be purchased at lower prices than knot-free lumber (if such a thing exists these days). Many lumberyards sell seconds or rejects which may be warped but are still suitable for this kind of winter project.
Rip 2X4s into 2X2s, and cut plywood or particle board into 4X5-foot lengths. This will produce a six-foot-high shanty.
The siding should be framed inside with 2X2s. Glue and nail or screw the framing to the siding to lend support to the completed shanty. Frame Two sides at once, hinging both sides together with a 3 1/2-inch door hinge at the top, middle and bottom with equal distances between each. The two sides should be hinged so they form a 90-degree angle when fully opened. Some overlapping will occur when the shanty is taken down.
Follow the above procedure to build and hinge together the other two walls. The four walls will fit together snugly when properly constructed. Any wall gaps can be corrected by countersinking hinges or covering the inside corners with black felt.
Cut a door opening in one wall, along the inside edge of the framing, at a height of 54 inches. The top inside edge of the door frame must be reinforced with 2X2s for strength, and the piano hinge can be cut in half and spaced equal distance from top and bottom to allow it to swing outward. Furniture knobs or drawer pulls, inside and out, allow opening and closing the door, and an inside screw eye and hook will keep the door shut tight.
Take your time, follow the directions, and you’ll have a portable ice shanty
Nail and glue two 2X2 braces on the inside shanty wall, opposite the door, to serve as ski mount braces. Small pieces of scrap 2X4s can be nailed or screwed together to form a six-inch-high outside elevation block on which skis can be attached with screws. This will allow for easier pulling through snow or over rough ice.
Two of the four pieces of sides (each 2X4-feet) are hinged together to make a floor. This section must be cut and framed so the outside walls will fit flush to the ice with the floor bracing and floor inside the fishing coop. Cut a fishing or spearing hole to the desired size.
Set the four walls and floor together, and attach each two-wall section together with chest latches. This will draw the walls together and make the shanty light-proof.
The remaining two 2X4-foot sheets of siding will form the top. Join them together by gluing and nailing or screwing the inside edges to a piece of 2X2. Frame the inside edge of the top so it sets on top of the four walls, and nestles inside the shanty walls and against the wall bracings.
Screw eyes are screwed into the inside roof bracing, and screw-eye hooks are fastened to wall bracings. These hooks will draw roof and walls tightly together when spaced equally around the four walls.
The finished shanty should be painted black, inside and out, to protect it from the weather, and to keep light out. Give outside walls two coats of paint.
Materials needed to build this rather inexpensive and portable ice shanty include:
- Six chest hinges
- Ten screw eyes and screw-eye hooks
- One pound No. 8 nails
- Fourteen 2X4X8s
- Four 4X8 sheets of ¼ inch plywood or particle board
- Six 3 ½-inch door hinges
- One one-inch piano hinge
- Glue
- Two furniture knobs or drawer drawer pulls
- A set of downhill skis
Skis with broken tips often can be obtained inexpensively from ski shops. Set-up and take-down time is less than five minutes for one person. A catalytic heater, minnow bucket, chair, fishing rods and tackle, plus a gas or manual auger can be stowed on top of the collapsed shanty and towed onto the ice. Don’t forget your fishing license and an empty bucket to carry home your fish.
No comments:
Post a Comment
Your comments are welcome. Please keep them 'on-topic' and cordial. Others besides me read this blog, too. Thanks for your input.